Dependency management
Preventing dependency hell
What are dependencies?
Dependencies are the versions of various different modules, packages, or software that your research code depends on: all of your imports.
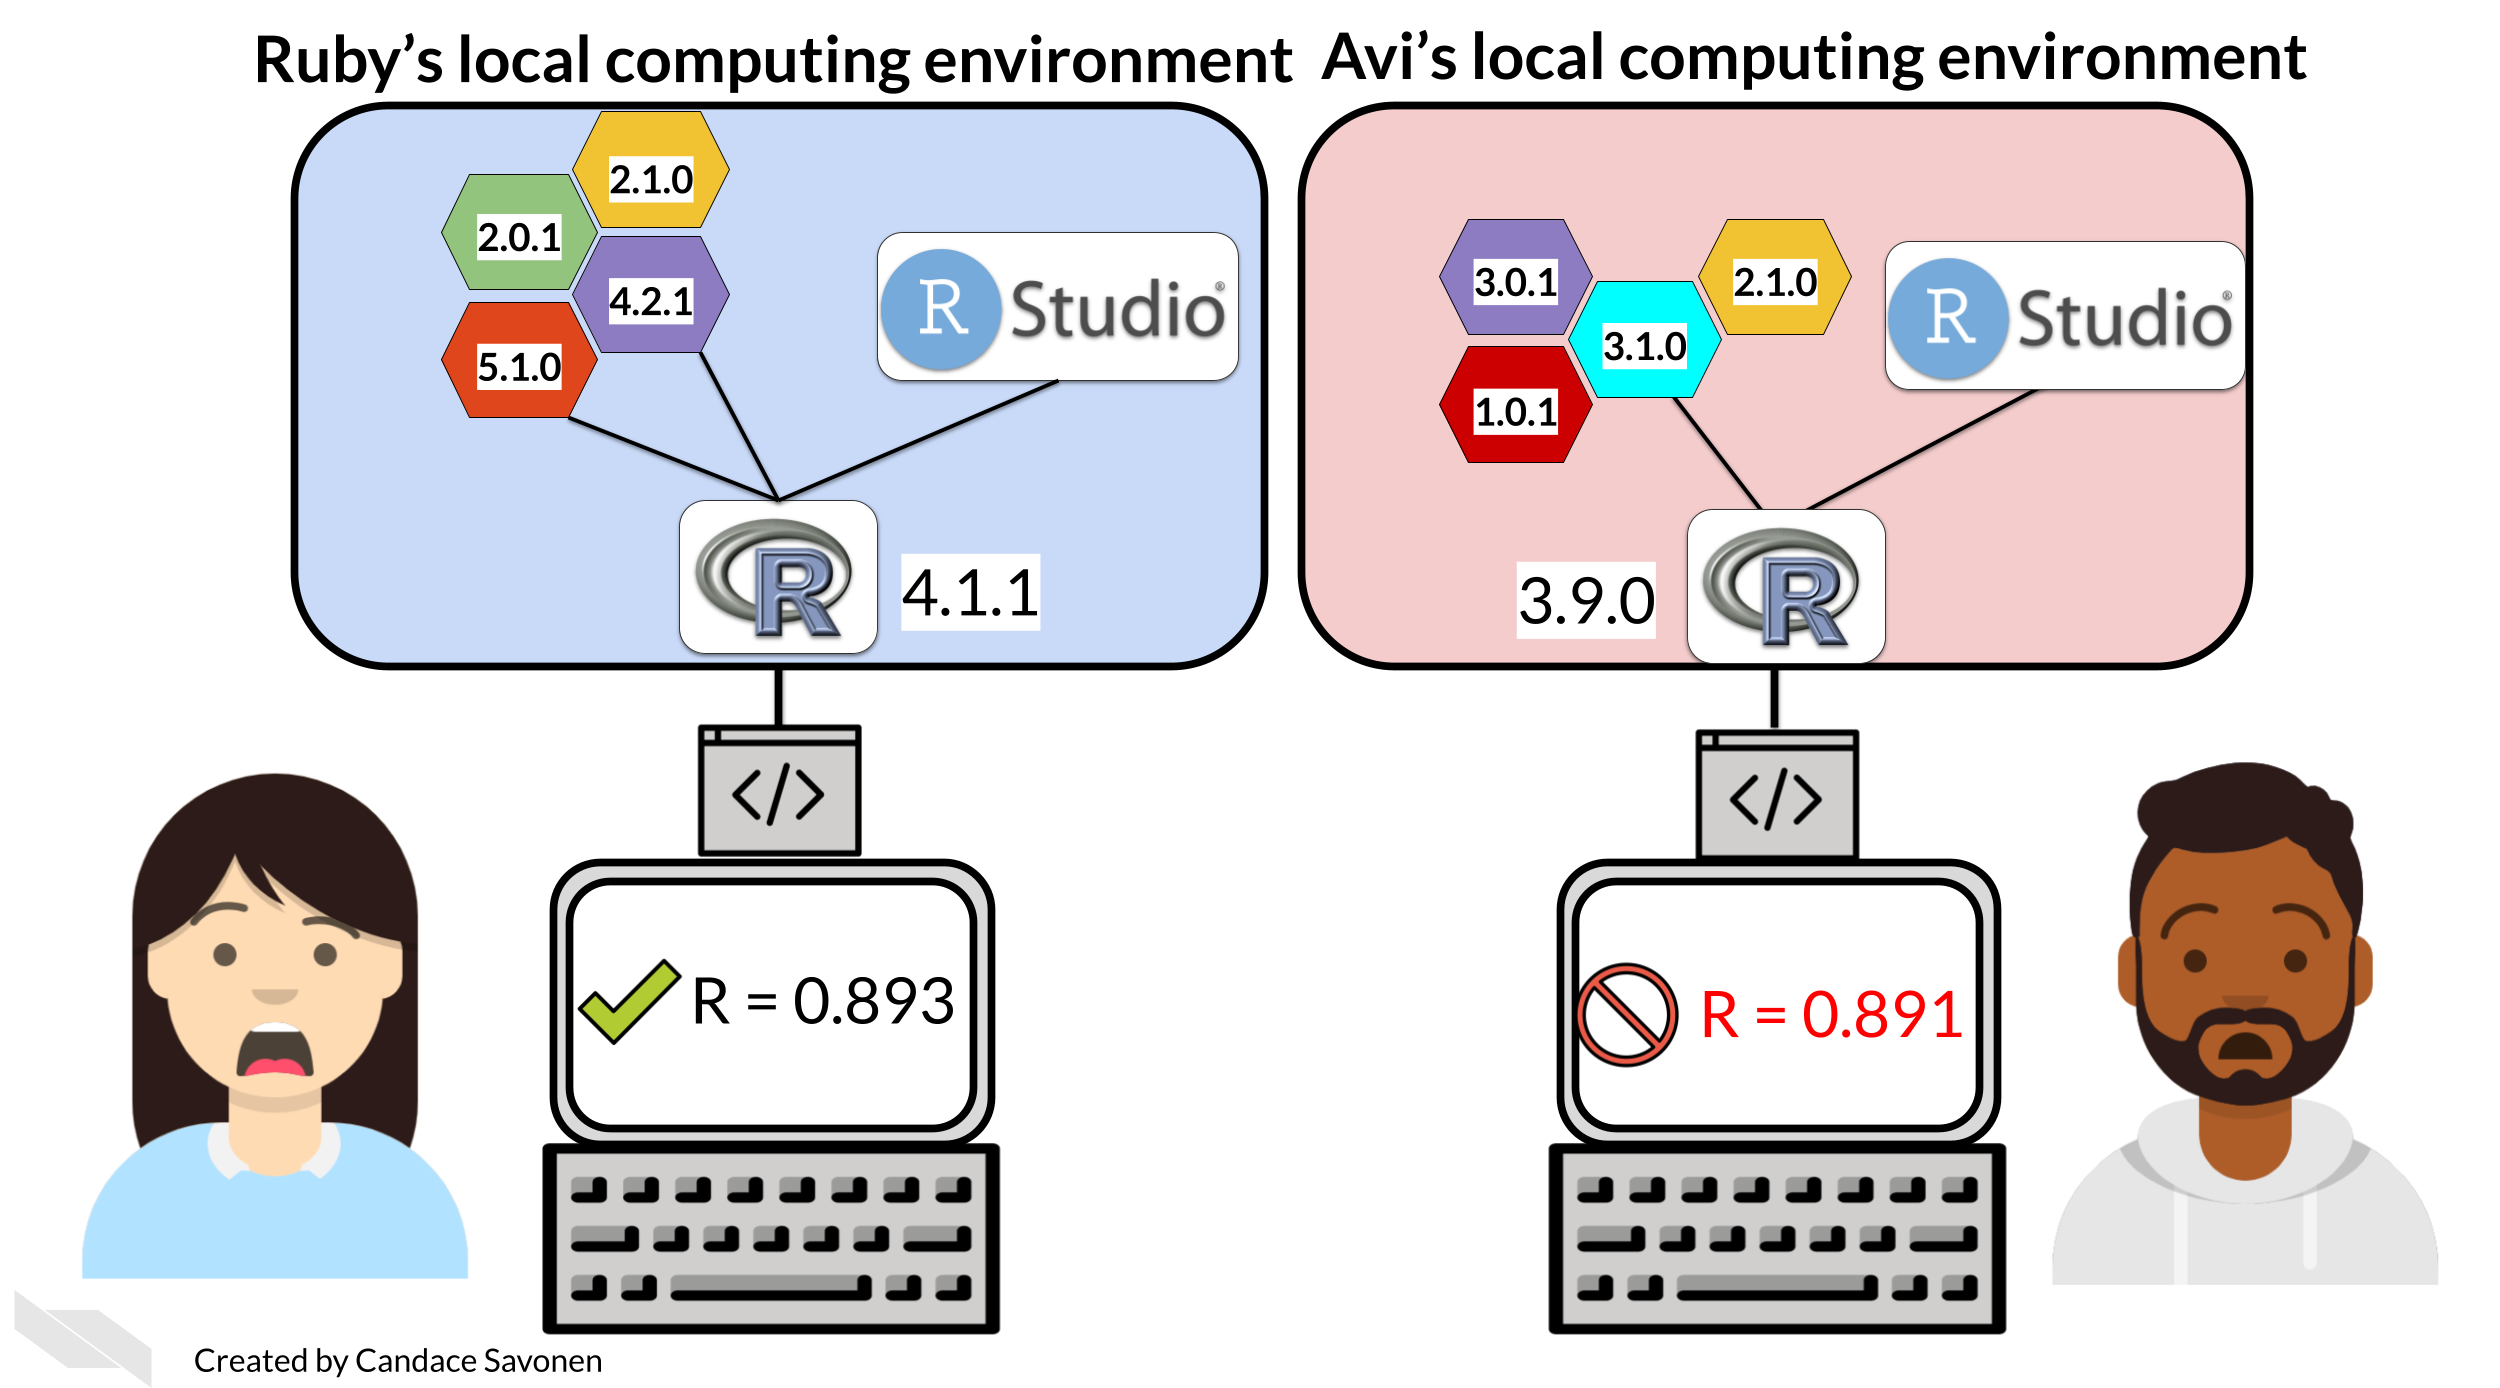
Don’t be like Ruby and Avi! Record your dependencies.
Image CC BY Candace Savonen, retrieved from Reproducibility in Cancer Informatics.
General Rules for Dependencies
Managing dependencies is something many, many people find complicated and difficult. Let’s start with some key ideas to simplify things.
NYU Libraries provide some straightforward guidance that is language agnostic:
- Use dependencies wisely and sparingly: don’t import dependencies you don’t actually use, and try to stick to libraries that have robust and stable releases.
- Use a package manager of some form: package management software, virtual environments and containers help to avoid conflicts and incompatibility errors between packages.
- Record your dependencies in a metadata file: package managers will often do this automatically for you; this file should be both human and machine readable.
Where to begin?
Package management software
Package management software usually:
- Provides a way for you to create an environment:
- A code project environment will contain a selection of relevant libraries, with specific versions.
- This is kept separate from other project environments.
- This allows you to use different versions of libraries for different projects.
- Provides a way for you to export your environment:
- This allows you to specify the exact libraries and library versions that were used to generate a set of results.
- This makes it easier for others to use your work and built on it, and reproduce your code environment.
- This saves you having to manually record library versions that you are using.
Package management software might also:
- Help you to solve dependency conflicts:
- Conflicts can arise when different packages depend on different versions of other packages in the background.
- This can be tricky to resolve.
- Remember the guideline “use dependencies wisely and sparingly” to minimise this issue.
- Provide a way for you to package your own code into a library:
- In addition to helping you juggle external dependencies, some package management solutions also provide a framework for turning your code into an installable package.
Depending on the language you are using, there may be many different options available. For example, for Python, you may have heard of:
- pip
- conda
- pixi
- uv
- poetry
How do you pick?
1. License
- Does the package manager have an open-source license?
2. Community
- What solution does your research group use? Does your supervisor have suggestions?
- What option can you find support for?
- What do researchers in your field use?
3. Documentation
- Does the package manager have easy-to-understand instructions and tutorials available?
4. Use-case
- Are you managing all external libraries, or are you building your own packages?
- Are you going to be pinning dependencies (like for a web-app)?
Conda
What is conda?
Conda is a widely used package management system
- This allows you to isolate different Python “environments” from each other, allowing you to use different versions of libraries or modules for different projects.
- However, mismanagement of packages can lead to dependency hell with tangled environments and incompatible versions of different modules.
Dependency hell

Python dependencies can get very messy…
Installing conda: fun licensing details
In order to use conda on your machine, I recommend you use the MiniForge installer, which by default loads packages from conda-forge.
If you are using Anaconda (provided by Anaconda.com), ensure you are not using the defaults channel to install packages as this falls under the recent Anaconda repository licensing changes.
Tl;dr: stick to open source to avoid licensing issues, by using a tool such as Miniforge which by default downloads packages from conda-forge and not proprietary channels.
Yaml files: the solution to all your problems
The key to conda: the .yml file
- Despite the fact conda is very widely used, especially in research, science, and data science fields, people often neglect the real magic of the system: the
environment.ymlfile. - This file is the recipe or configuration for your environment.
Who here regularly uses environment.yml files in their workflow?
What’s Yaml or yml?
YAML is a human readable format for plain text files (usually with the file ending
.yml), often used for configuration of other programs.It’s the format
environment.ymlfiles are written in.
What’s in a yml file?
What does a .yml file look like?
We just need to create a plain text file called environment.yml or something else sensible, and list the packages we need!
Create a new environment
We can then turn this into a conda environment:
- Open up the terminal in the folder with our
environment.ymlfile - run the following command:
You’ll get a lot of output, as it finds the various packages online and goes about solving all your dependencies in the background.
Why use a .yml file?
Can’t I just create a fresh environment from the command line like this?
And then activate it and add dependencies like this?
You absolutely can, but theres a few reasons why you shouldn’t.
Why not?
- Things you install later (e.g.
pyteston the last slide) will be pinned by the versions of libraries installed at an earlier stage (so the basepythonversion andnumpy), which can lead to dependency conflicts. - You can end up with a lot of crud and old unneeded libraries that you no longer used bloating your environment.
- You don’t have a nice, tidy record of what you installed and when.
So how do we add things?
If you want to add a new package that you didn’t include in your original environment.yml file, or pin a package to a specific version, you can go and do so within the environment.yml.
- Just add any new packages to the list of dependencies, and pin libraries with the
=notation as in the first example. - Once your
environment.ymlfile is up to date, you can apply the changes to your conda environment:
The --prune argument here clears out old unused libraries and is key to keeping your .conda folder a reasonable size.
Why does this work?
- Running
conda install package-namefrom within your environment can lead to dependency conflicts (say your env has an older version ofnumpyand you’ve tried toconda installanother package that can’t support this) - Updating the environment from the
.ymlfile allows the solver to work through the dependencies at the same time. There may still be conflicts, but many easily avoidable issues will disappear.
Myth: the env.yml is too prescriptive
- You may have struggled building a conda environment from a yml file before
- This yml file may have had lots of pinned dependencies that don’t work on the system you are trying to install on
- This leads people to think that environment files are too prescriptive/restrictive and not useful for sharing environments
- This conda environment file may have been built with the
conda env exportcommand - let’s learn about it!
Exporting a conda env
Say you have a conda environment file similar to the one shown below, with very minimal pinned dependencies. For the sake of reproducibility, you want a better record of exactly what libraries you used, right?
Exporting a conda env
This is where the export option comes in. From inside your active environment, simply run:
- The command above will export an extremely detailed list of everything in your environment (including background dependencies and their exact version numbers) to the file
env-record.yml. - Sometimes, you might find it appropriate to export this to a filename with the date, for example
2024-11-27-env-record.yml.
env.yml files being restrictive
This is where the myth of the conda env.yml being prohibitively restrictive comes in:
- people often try to use this exported file to build a replica of the same environment on a different machine
- however this exported file contains specific details of backends and builds that will likely not be transferrable across different computers.
This is why I prefer to export it into a file name like env-record instead of just environment: it makes it very obvious this is recording the state of the environment as opposed to building a recipe to rebuild it.
Exporting conda environments
This exported environment file is mainly useful as a record for the sake of reproducibility, not for reusability.
If you produce results with your code that are being used in some form of research output (e.g. a paper), export your environment at the time when the results are being generated, so you have a record of the versions of different libraries you used.
This is why I said it is good to build and update your environment from your environment.yml file: that way you have a reusable recipe that you can share and use to rebuild your environment, but you can also use export to get a super detailed snapshot for any sets of results!
More exporting
If you ignored all my advice about not building a haphazard environment incrementally with conda install, there is still hope: you can use the --from-history flag comes in to play:
This will produce a clean conda environment file similar to the example we gave at the start of this post, listing only the packages directly explicitly installed (without background dependencies or build details).
However, things will get messy if you start adding in pip dependencies…
Mixing in pip
Using a conda environment.yml makes working with pip and conda together less painful.
- You will have heard (or experienced first hand) that once you install pip in a conda env, everything from that point on must be pip, or you will break the environment.
- This is true, but you can get around this by adding your pip dependencies to your
environment.ymlfile.
Mixing in pip
Just add your pip dependencies to your environment file, then run conda env update --file environment.yml --prune as previously described:
name: env-with-pip-dependencies
dependencies:
# Whatever packages you need for your project
  - python=3.12
  - numpy
  - matplotlib
  - pandas
  - pip
  - pip:
    - black
    - https://github.com/YOUR-USERNAME/YOUR-REPO-NAME/releases/download/YOUR-VERSION-NAME/PACKAGENAME-VERSION.tar.gz # you can even install your own packages that you host on GitHub
You can update this as described above.
Exporting with pip
Exporting the full record works the same if you have pip dependencies:
However, --from-history will not include pip dependencies…
Exporting with pip - advanced
However, --from-history will not include pip dependencies…
If you’ve followed our advice until now (and built your conda environment from a file), this won’t be an issue.
But if you ignored us or are trying to salvage old code, thankfully, there are a few different workarounds!
This is outside of the scope of the talk today, but the instructions for exporting are here:
Modified from this conversation on GitHub, this code snippet will export your conda and pip dependencies without version numbers (so that the environment.yml file can be used to build a new environment):
# Extract installed pip packages
pip_packages=$(conda env export | grep -A9999 ".*- pip:" | grep -v "^prefix: " | cut -f1 -d"=")

# Export conda environment without builds, and append pip packages
conda env export --from-history | grep -v "^prefix: " > new-environment.yml
echo "$pip_packages" >> new-environment.yml
But remember: it is better to keep your environment.yml file current, and update your conda env from this file, as opposed to adding packages using conda install and then trying to export details to your environment file to track these changes.
A general workflow
- Create your conda environment from an environment file, and update/add packages to your environment by using this file. You can keep this environment file version controlled with git alongside your code.
- Export your conda environment to a record file when you change it and produce results with it. You can keep this environment record file version controlled with git alongside your results.
Reproducibility vs reusability
Remember that for reusability, you want:
- An easy-to install conda environment, that works across different computers.
- You can share this with your code to make your work more open
For reproducibility, you need the code to be reusable, but also:
- You want an exact record of the environment as it was when you produced your results.
Environments should be treated as disposable and easily rebuildable, we can use version control and tests to make sure that’s true.
In Conclusion
- If you are using conda, use your conda
environment.ymlto keep control of the packages you have installed. - Use
conda env export > env-record.ymlto export records of your environments for reproducibility, but use the--from-historytag to make it more reusable.